Recently I've decided to focus this blog on crafting, its something I love to do and something I'm good at. Although the main focus will shift, we will still cover other topics now and again.
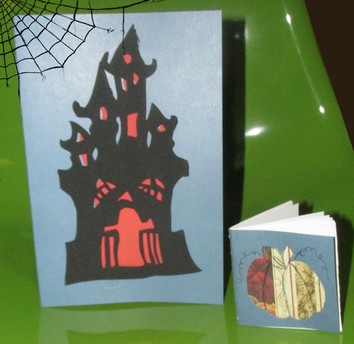
Halloween is around the corner and I've signed up to be a part of a card and gift swap with other Halloween enthusiasts! The rules state that store bought is fine, but the host of the swap encourages creative handmade items. I've made the card and notebook as just the start to the goodies I'm going to be sending to my partner.
Materials for the card:
1) Cardstock (I used blue from COLORBӦK's Earthtone collection)
2) Spooky Castle Image (I chose a free clip art)
3) Black foam sheet
4) Orange paint and a paint brush
5) Exacto knife and scissors
6) Glue
Instructions for the card:
1) Print out the image of your spooky castle, then use it as a stencil for the foam sheet, or hand draw your image directly on the foam sheet. Cut it out and set it aside
2) Measure the size card you need to make and trim your cardstock to that size this one is 6 inches wide and 9 inches tall, remember to double your width so you can fold it in half.
3) Lay your image on the card but do not glue it yet! trace where the windows and doorway are.
4) Paint directly on the card with your orange paint the areas you just traced. Set aside and wait for it to dry.
5) While the paint is drying you can look up poems or quotes to write on the inside when the card is finished.
6) Once the paint is dry glue your foam castle to the card then wait for the glue to dry. I suggest using E6000 glue as it will handle the weight of the foam.
7) When it is dry you can then write on the inside and decorate as you see fit.
Materials for the notebook:
1) Cardstock (I used the same cardstock as before)
2) Vintage scrapbook paper (you can either find an image online or use storebought)
3) Black pen
4) Plain computer paper
5) Stapler (with staples of course)
6) School glue
Instructions:
1) Determine what size you would like to make your notebook. This one is 3 inches by 3 inches (again remember to double your width to fold it in half).
2) Measure out 2 strips of white paper (stack 5 sheets together first) they need to be 3 inches tall and 6 inches long.
3) Stack these two strips together so you have 10 sheets now then fold in half
4) Line yup your paper and your cardstock, lay them paper side down as you staple them on the crease, one on top one on bottom will hold it all together nicely.
5) Draw a pumpkin, trace a pumpkin, or use a pumpkin stencil on your vintage paper.
6) Cut out the pumpkin and glue it to the front of the notebook, then let it dry.
7) Once it is dry you can then draw in the details.
 RSS Feed
